This post covers creating a hack for the game Counter Strike: Global Offensive. The hack I’ve developed works in combination with the Linux version of the game - coding a windows-based hack can however be done with the same methodology and tools.
These are the features I’ve integrated into the hack:
- Bunnyhop Bot: Do jumps as soon as the player hits the ground to make it easier to perform bunny hop chains
- No Flash: Be immune to flash grenades that would block the players vision
- Aimbot: Automatically aim at the head of the nearest enemy
Tooling & Setup
Linux lacks of good tools to perform the kind of analysis tasks required to code a cheat like this. There are pince and scanmem available but they only provide a limited set of the required features. In the Windows world, there’s handy tool called Cheat Engine that is capable of all the required tasks, like:
- Searching for addresses in the memory space of the target process by performing filter-based searches
- Pointer scan: Search for pointers to addresses
- Debugger: Determine functions that read and write from/to specific addresses
Fortunately, Cheat Engine is split into two parts: ceserver and the GUI. It’s possible to launch the Linux version of ceserver natively and launch the GUI using wine. The GUI can then be connected to the server using a local socket. Of course, ceserver has to be run as root in order to read and write memory of arbitrary target processes. This setup is semi-stable but still the best for Linux at the moment, at least in my opinion :)
Basics
Once Cheat Engine is attached to the CS:GO process, it can access the whole memory space of that process. This also includes the shared objects that are present in the target memory. The memory layout can be inspected with cat /proc/<PID>/maps.
Once a game client is connected to a network game, it doesn’t only know the local player’s health and location but also the respective values of all team mates and enemies. The game wouldn’t show it of course, but the information is present in the process memory. Objects and structures in this memory are structured according to the game engine’s source code. The developers of CS:GO however applied some changes in regard to the released SDK, so some things may still be different in the actual game memory.
The class CBaseEntity is, among other things, responsible for managing the data of player objects. All values present in that memory structure can be found in the SDK source code.
A general approach is to find the exact location of these data structures in the game memory in order to analyze and reverse engineer them. For example, enemy locations can be read and other values can be written in order to achieve a certain goal. Please note that it’s not as simple as finding a memory location and using the address of the memory structure in the hack because this value changes upon restarting the game. To get around this, a static pointer to the address or a static pointer to a pointer (and so on) to the address are required. The game executable and the loaded libraries may contain static pointers that lead to the start of a data structure in game memory at runtime.
For example, the shared object that manages the players in the game is called client_panorama_client.so. This library contains a static pointer to a data structure in game memory that in turn contains the CBaseEntity object of the current player at a specific offset:
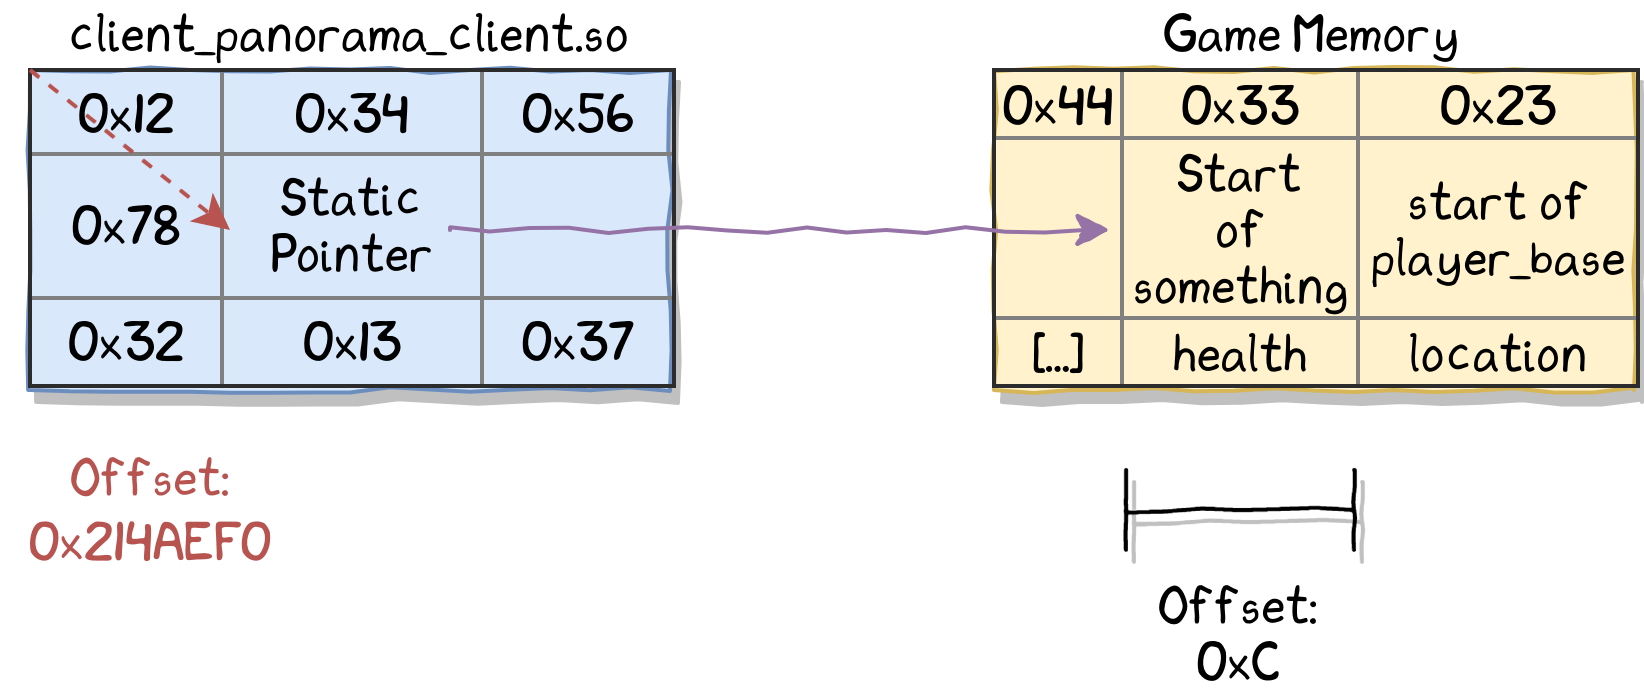
Note: This data structure is sometimes also called “player base” or “local player”.
This means that it’s possible to use these multi level pointers to consistently find the desired data structures in memory, even across game restarts. Please keep in mind that you need a static pointer for this or otherwise the pointer may not be valid after a game restart.
The pointer scan feature of Cheat Engine helps when performing this analysis step by searching for all pointers that point to a given address, like the beginning of the CBaseEntity. An easy approach to determine whether a given pointer is static or not is to add it to list in Cheat Engine and restarting the game multiple times. If it’s still valid, it may be static and you can use it in the cheat.
After the game was updated, certain offsets and addresses may be changed, since some parts have been re-compiled, added or removed. To overcome this issue, you can use dumpers such as tuxdump or hazedumper. These tools are able to read the offsets to various in-game structures by making use of pattern matching. In case of hazedumper, updating offsets is as convenient as downloading a new version of the csgo.hpp header file, since it’s being updated automatically after CS:GO updates have been released on Steam. I didn’t use these dumpers, since I’ve reverse engineered the memory layout manually but you are of course free to use it to make your life easier.
Bunnyhop Bot
With the CBaseEntity object now being available to the hack, it’s possible to detect whether the player is currently on the ground or not. There’s a boolean value in this data structures that stores this information.
The only other thing required for bunnyhopping is invoking jumps programmatically. Of course, sending a key event may be a working solution. However, the cheat can’t be sure which key the player actually uses for jumping. Because of this, another approach has been implemented.
The game uses certain memory addresses as interrupts. As soon as a special value is present at one address, the game invokes a jump all by itself. The jump interrupt address can be found with the following approach:
- Scan for unknown initial 4 byte value in Cheat Engine
- In the in-game console type
+jump. This tells the game that the jump button has been pressed and is being held - Search for changed value
- Type
-jump, which tells the game that the jump button has been released - Search for changed value
- Repeat until only a few addresses are remaining
By reverse engineering the game, it can be found that writing the value 0x06 to the correct interrupt address will cause the player to perform a jump. The remaining addresses can be filtered by writing this value to them. If no jump has been invoked, it’s the wrong address.
After finding a static pointer to this interrupt address, bunny hopping can be implemented easily.
No Flash
It turns out that the game keeps an internal counter that’s initially set to a high value once the player gets flashed. After each frame this counter gets decremented and over time the flash effect slowly fades. To stop the flash effect it’s therefore required to write a zero value to this specific address. Cheat engine once again helps in finding the correct address and static pointer to this value.
The following animation shows what happens when a player gets flashed without and with the hack activated:

Aimbot
There are quite some steps required in order to get this work. The local player’s location, as in X, Y and Z coordinates can be found in the CBaseEntity structure that has been found before. Every additional required step is covered in its own section.
Getting Enemy Locations
The enemy locations can be found by making use of various methods. In my cheat, I’ve used the so-called GlowObjectManager method. This is a structure in memory that, for whatever reason, holds structures that include pointers to all entities on the map (CBaseEntity structures). Each sub-structure is 0x40 bytes large and starts with the entity pointer element. The manager structure also contains a counter value that can be used in order to loop through all available entities in a loop.
The location of enemy entities on the map can be read directly from memory. Determining the offset of the entity locations can be accomplished by pushing players around and watching the memory change:
Dead enemies and team mates can be filtered by making use of other member values of CBaseEntity. The values that are present in the determined memory regions have to be converted to floats before processing this data any further.
Getting the Nearest Enemy
With the local player’s and all enemy coordinates ready, it’s quite easy to determine the nearest enemy using mad math skills:
return std::sqrt(std::pow(entity_x - own_x, 2) + std::pow(entity_y - own_y, 2) + std::pow(entity_z - own_z, 2));
Setting the Camera Angle
After using the in-game console command cl_showpos 1, the current camera angle can be displayed on the screen. By moving the mouse and searching for changed values in Cheat Engine, multiple addresses can be found that hold the current camera angle. However, only one can be used to actually set this angle programmatically.
Calculating the Camera Angle
The only thing that’s still required is calculating the camera angle in order to automatically aim at the enemy. The following function takes the local player’s and the enemy coordinates and magically calculates this angle:
// Slightly modified standard `CalculateAngle` function.
std::vector<float> MadMath::calcAngle(std::vector<float> src, std::vector<float> dst)
{
    std::vector<float> angles;
    std::vector<double> delta = {src[0] - dst[0], src[1] - dst[1], src[2] - dst[2]};
    double hyp = std::sqrt(delta[0] * delta[0] + delta[2] * delta[2]);

    angles.push_back((float)(asinf(delta[1] / hyp) * RADIANT));
    angles.push_back((float)(atanf(delta[2] / delta[0]) * RADIANT));
    angles.push_back(0);

    if (delta[0] >= 0)
    {
        angles[1] += 180.0f;
    }

    return angles;
}
This works because of reasons and it’s great. Check out this video by GuidedHacking if you want to learn why and how this works.
Below you can find a demonstration of the aimbot:
Playing Online
It definitively works but you will get banned because the aimbot just aims through walls, no matter if the enemy can actually be seen or not :D